Waterproofing your shower isn’t just a matter of routine maintenance; it’s a fundamental aspect of bathroom design that safeguards the health of your home and the comfort of those who live in it. The presence of moisture and humidity in a shower area is inevitable, but without proper protection, this damp environment can become a breeding ground for mold and mildew, leading to potential health issues and costly repairs. Beyond these concerns, water seepage can also lead to structural damage, with the hidden peril of water infiltrating unseen areas, causing decay and weakening integral parts of your home’s construction.
This is where the strategic application of a waterproofing system comes into play, serving as an invisible shield that keeps the integrity of your shower intact. With advancements in chemical solutions, such as the BASF PCI® range of solvent-free, fast-curing products, the process of creating a fully waterproofed shower space has become accessible to both professionals and DIY enthusiasts alike.
In this guide, we’ll walk you through the essential steps of transforming your shower into a moisture-resistant fortress. From preparing your walls and floors, applying a reliable tanking system, to the final touches of sealing and grouting, you’ll learn how to create a barrier that not only performs effectively but also enhances the longevity and hygiene of your bathroom. Whether you’re embarking on a new bathroom build or renovating an existing space, understanding the nuances of waterproofing is key to achieving a mold-free, durable shower that stands the test of time.
Understanding Waterproofing Basics: The Foundation of a Healthy Shower

Before delving into the intricacies of waterproofing your shower, it’s essential to grasp the fundamentals. Waterproofing is not just a preventative measure; it’s a critical component that ensures your shower remains dry and functional, protecting the rest of your home from the potential havoc that water leakage can wreak.
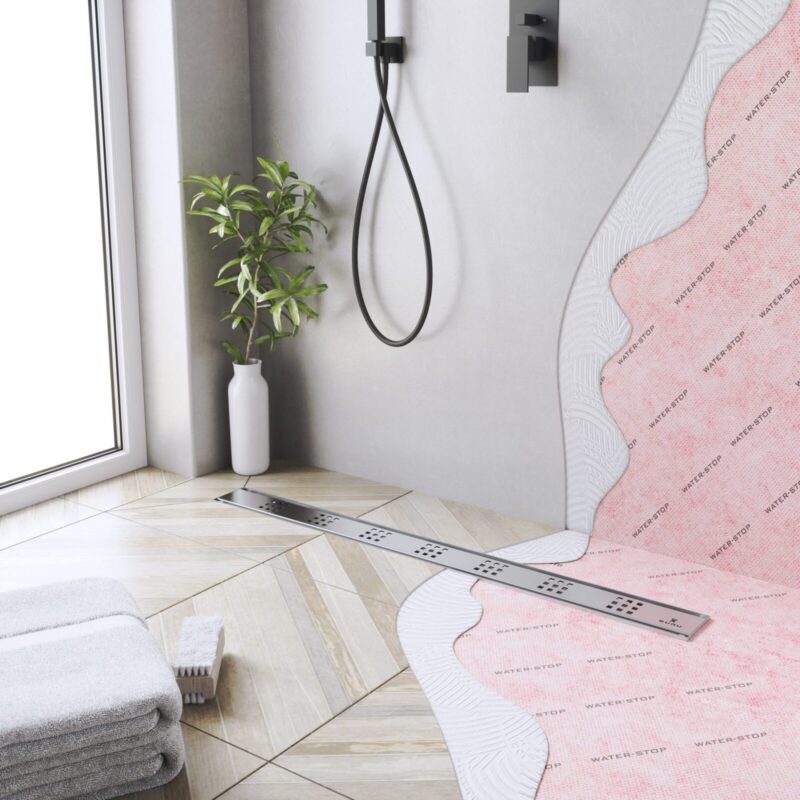
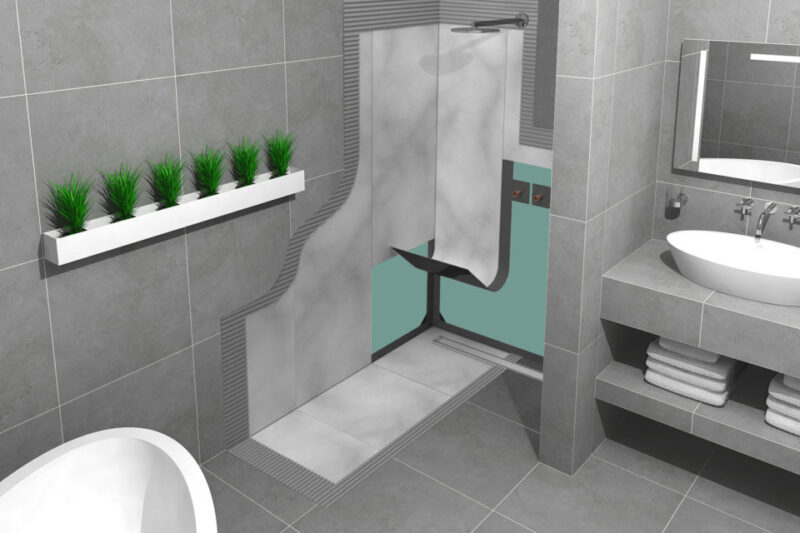
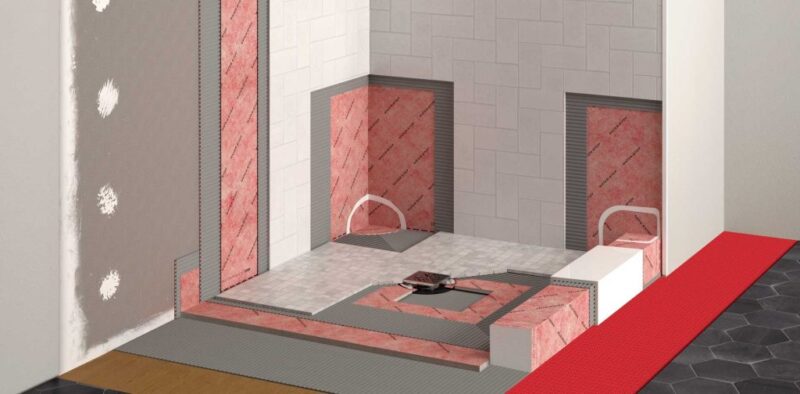
At its core, waterproofing a shower involves creating a water-resistant barrier on the walls and floor, which prevents water from penetrating and reaching the underlying structures. This barrier needs to be both flexible to handle slight structural shifts and durable enough to withstand constant exposure to water and cleaning agents. The goal is to channel water away from surfaces where it can cause harm and direct it toward the drain.
The BASF PCI® product line, recognized for its quality and reliability, offers a suite of chemicals specifically designed for this purpose. These products are solvent-free, reducing the risk of harmful fumes, and are fast-curing, which is ideal for both time-sensitive projects and long-term durability. When applied correctly, they provide a robust defense against moisture, preventing the growth of mold and mildew and maintaining the integrity of the shower’s structure.
As we proceed, keep in mind that waterproofing is not a single-step process but a series of carefully planned and executed actions. Each step, from selecting the right materials to applying them correctly, is pivotal in creating a shower space that is not only water-resistant but also safe and enjoyable to use for years to come. With this understanding, you’re now ready to move forward and learn about the practical steps of waterproofing your shower like a pro.
Getting Started: Surface Preparation
Proper surface preparation is the cornerstone of any successful waterproofing job. Here’s how to ensure your shower surfaces are ready for waterproofing:
- Inspection: Begin by inspecting the shower area thoroughly for any signs of damage, cracks, or loose tiles. Any such issues must be repaired before waterproofing can commence.
- Cleaning: Clean the surfaces to remove any dirt, oil, soap scum, or other residues. The waterproofing products need a clean surface to adhere properly.
- Drying: Ensure that the area is completely dry. Any moisture trapped below the waterproofing layer can lead to mold growth and compromise the integrity of the barrier.
- Smoothing Out Irregularities: Use a quality patching compound to fill in holes, cracks, or uneven sections. A smooth surface ensures even application of waterproofing materials.
- Primer Application: Apply a primer designed for waterproofing purposes, like BASF PCI® Gisogrund®. This step is crucial for enhancing the adhesion of the waterproofing membrane.
- Moisture Content Check: Especially critical for new constructions, verify that the moisture content of surfaces like cement screed does not exceed recommended levels (typically not exceeding 4% for cement screeds).
By diligently preparing your shower surface, you lay the groundwork for a waterproofing process that is efficient, effective, and enduring. Remember, the better the preparation, the more reliable your waterproofing will be, providing peace of mind and a foundation for the subsequent steps in your waterproofing project.
The First Defense: Priming Your Shower

Priming is the pivotal first defense in the waterproofing process, forming a receptive layer for subsequent waterproofing materials to adhere to. Here’s how to prime your shower effectively:
- Choose the Right Primer: Select a primer specifically formulated for shower waterproofing, like the BASF PCI® Gisogrund®, which is suitable for a variety of substrates.
- Even Application: Apply the primer evenly across all surfaces. This includes walls, floors, and especially the corners where water tends to collect.
- Curing Time: Allow the primer to dry completely before proceeding. Follow the manufacturer’s recommended curing times to ensure the best results.
- Test for Readiness: Before moving on, ensure the primer is tack-free and the surface is stable. A properly primed surface should not be sticky but should have a slight grip to touch.
By priming your shower surfaces, you’re setting the stage for a robust waterproofing job that will stand up to the rigors of daily use.
Seamless Waterproofing: From Leveling to Sealing Your Shower

Creating a watertight shower starts with a meticulously even base, achievable through the use of floor leveling compounds. Products like PCI USP 32® are instrumental in smoothing out any surface irregularities, which is a critical step for ensuring that the waterproofing layer adheres evenly and performs optimally. Once the base is even, tanking the shower area is next. This process involves applying a liquid coating that cures to form a robust waterproof barrier. Proper tanking is essential, as it prevents water from reaching the structure beneath. Additionally, maintaining and replacing shower faucet parts regularly can also contribute to a watertight shower, as leaks and malfunctioning fixtures can compromise the overall waterproofing system.
The next stage in the waterproofing symphony is the application of the membrane, a true workhorse in moisture protection. This layer is where PCI Pecitape® comes into play, strategically laid down to bridge gaps and ensure every nook is shielded against water ingress. With the membrane in place, tile adhesive becomes the next focus. PCI Nanolight®, with its formidable bonding strength, is mixed and applied to fix tiles securely, an integral part of the waterproofing ensemble.
Grouting is not merely a filler; it is a precision tool that seals the deal between tiles, locking out moisture and adding to the shower’s overall waterproof integrity. A product like PCI Nanofug® Premium® is ideal for achieving not just an effective seal, but also a pleasing final look. Finally, no waterproofing job is complete without the application of a joint sealant. PCI Silcofug® is the finishing touch that ensures every joint and edge within the shower area is sealed, providing a barrier against leaks and solidifying the shower’s defenses against water.
Conclusion: Ensuring a Water-Tight Future for Your Shower

As we wrap up this guide, it’s clear that waterproofing a shower is a multilayered process that, when done correctly, forms an impenetrable barrier against moisture and the problems it brings. From the initial leveling of surfaces to the final application of sealant, each step is a critical piece of the puzzle, ensuring your shower remains a place of refuge and relaxation, not a source of worry and water damage.
Remember, while this overview provides the groundwork, there’s a wealth of detailed information and practical advice waiting for you. For those eager to delve deeper into the intricacies of creating a flawlessly waterproofed shower, further resources are just a click away.
With the right approach and quality materials, your shower will stand as a testament to well-executed craftsmanship and the peace of mind that comes with it. For a comprehensive guide that will walk you through each stage of the waterproofing journey, visit https://wetroomsdesign.co.uk/waterproofing-a-shower-diy-insulation-guide.


